
Measure LED forward voltage using Arduino
Arduino is used for many things, including testing and measuring component values.Somebody has made a resistance meter:
http://learningaboutelectronics.com/Articles/Arduino-ohmmeter.php
Another has made a capacitance meter:
https://www.arduino.cc/en/Tutorial/CapacitanceMeter
Yet another has made an inductance meter:
https://foc-electronics.com/index.php/2017/12/06/how-to-measure-inductance-with-an-arduino/
There is one missing: determine LED forward voltage.
LED comes in variety of colours, and these variations comes from different materials and different doping densities. As a result, the forward voltage of these LEDs are also not the same - lower-energy-light LEDs (e.g. red) usually require less forward voltage than higher-energy-light LEDs (white or blue). The only sure way to know is by reading its datasheet.
But what if you don't have the datasheet? Or you don't know what is the datasheet for some particular LEDs? (e.g. LEDs you salvage from some old boards).
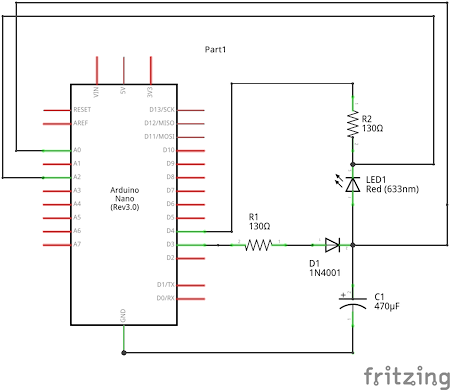
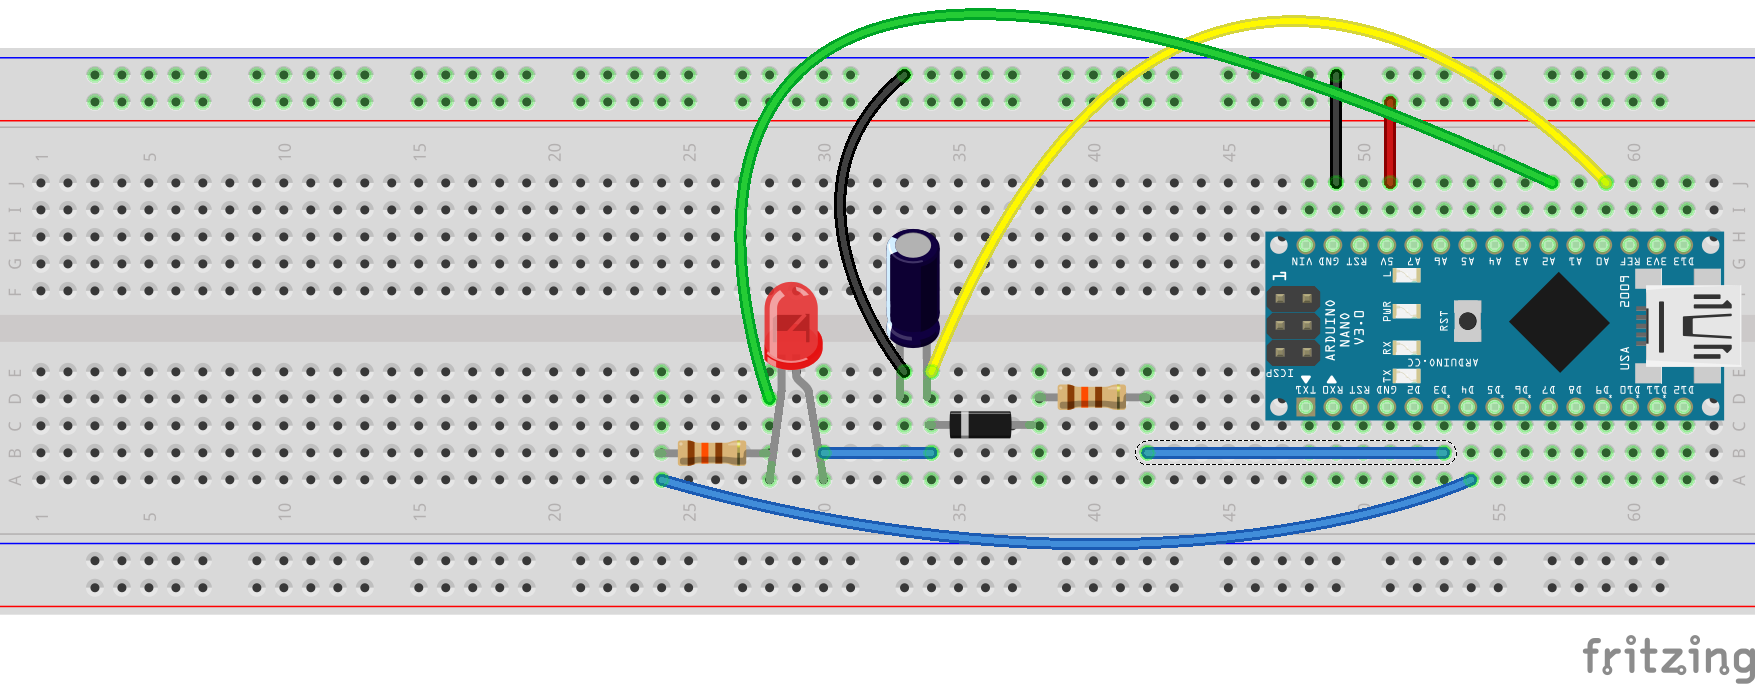
The following Arduino circuit should help you. It helps you to figure out what is the forward voltage for an LED.
Connections
Sketch
Get the sketch.
Principle of operation
Initially we have both D3 and D4 as high (=5V). This charges the capacitor, and turns off the LED.
Then drop both D3 and D4 to low. The diode prevents the capacitor from bleeding off its charge through D3, so the only way it can discharge now is via the LED.
A0 measures the capacitor voltage.
A2 measures series resistor voltage.
A2-A0 gives you the LED voltage.
In the ideal situation, you expect to see that A0 and A2 will keep dropping off until the conduction suddenly stops, A2 becomes zero (because no more current flows through it), and then A0 will give you the LED forward voltage.
Of course, in real world this does not happen. If you test that circuit you will find that the LED will keep giving out light even when it's below its official forward voltage, and if you wait until the current is zero, the A0 voltage you get will be very much below the nominal forward voltage.
So how do we know how to stop measuring? Well, most LEDs are usually specified to be "conducting" when it pass at least 5mA of current. So when we detect the current across the resistor to be less than 5mA, we stop measuring and declare that the A2-A0 of the last measurement as the forward voltage.
Oh, how do you get the LED current? LED current is the same current that pass through its series resistor (ignoring current going out to A2). The current in the series resistor is simply its voltage (A2) divided by its resistance (130R).
Caveat
The voltage-current relation of a LED is the same as any diode - it's exponential. In other words, the forward voltage depends on the amount of current that flows (or better yet: the current that flows depend on the applied voltage). There is no single one fixed "forward voltage"; the LED will actually conduct and shine (with varying brightness) on voltages lower or higher than the official forward-voltage.
Ok, that helps. But how about forward current?
Typical LEDs uses 20mA forward current. This is regardless of the colour or the forward voltage. So there you have it. Of course, main exception for this rule is super-bright high-wattage LEDs which is meant for room illumination or for torches. These can easily pass 100mA, and some can even crank up to 500mA or more. Forward voltages on these kind of LEDs can vary a lot depending on whether you're passing 5mA or 500mA. The tester above won't work properly with these kind of LEDs.
FAQs
Q1: Why pin D3 and D4? Not D8 or D9?
A1: Because I like it that way. You can change it, but be sure to change the code too.
Q2: Why analog pins A0 and A2?
A2: Because I like it that way too. Actually, that's because an earlier design used 3 analog pins, but later on I found out that one of them (located in A1) isn't necessary, but I've already wired the circuit with A2, so it stays there. Of course you can change it, but remember to update the code too.
Q3: Why do you use 130R?
A3: 130R is the series resistor you use for LEDs with 2.4 forward voltage (green LEDs usually), which is somewhat in the middle of the range for LED forward voltages. Plus, they're what I have laying around.
Q4: Why 470uF?
A4: That's what I have laying around too. You can use other values, but make sure they're not too small.
Q5: The diode - IN4001 - you also use that because that's what you have laying around?
A5: Actually you can use any diode. In my circuit I actually used IN4007 because that's what I have laying around :)
And finally:
Q6: Why do you have separate D3 and D4? Since they will be brought HIGH and LOW at the same time, why not just use one pin?
A6: Yes, you can do it that way (remember to change the code). But using two pins make it clearer of what is happening.
Edit - Delete
No comments posted yet.

